Monday, February 11, 2013

February Giveaway!!!!

Happy February!

I've been away from my blog for a little while, so I thought I'd do a giveaway to help breathe some life back into things. Well, that and I can't seem to get the Rafflecopter widget installed on the Kozy Kuddlers Facebook page. (I've been noticing a lot of issues with RC lately...IDK if it's just me, but not cool. If I can get it added, it will also be posted on the FB page. For now, it's only here on the blog.)

With getting things going again, I discovered that the price of cherry pits more than doubled! Whoa! There was a freeze that hurt the 2012 cherry crop, so prices went up, up, up! I'm going to try and keep prices reasonable though and absorb what I can. I was able to secure some cherry pits though, so I'm doing a little happy dance over here. 

Here's a little more info about Kozy Kuddlers, since I'm sure you were wondering:
What are Kozy Kuddlers?
Kozy Kuddlers are Hot/Cold Cherry Stone Packs. They can be heated in the microwave for warm, moist heat therapy, or chilled in the freezer for some cooling relief! 
Cherry WHAT?!
Cherry stones are the stone seeds from a cherry. The cherry stones I use are all natural, specially cleaned and dried, with no added chemicals. You MAY add a few drops of essential oil to your Kozy Kuddler for aromatherapy purposes if you so choose. I recommend testing a small spot on the Kozy Kuddler because some oil can stain fabrics.
What can they be used for?
Migraines, Sprains and Strains, Pregnancy aches and pains, Breastfeeding discomforts or to help with let down, Arthritis, Sore muscles, Feet & Hand Warmers, Bed Warmers, Back aches, Bumps and Bruises on little ones, Menstrual cramps, Headaches, Pain relief after shots...Any place direct application of heat or cold would be warranted…So many possibilities!
Several sizes and shapes available! I also take special orders! 


Good luck!
Here is a photo of the KK up for grabs!! 


a Rafflecopter giveaway

Friday, September 14, 2012

Reusable Nursing Pad Giveaway Ends 9/30/12


Hey everybody! Finally touching base again on a sewing topic. Yay! 
I've been crafting up a storm lately, well when I haven't been fighting with my sewing machine anyways. 
I've made up quite a few reusable nursing pads and wanted to share! These are the same nursing pads I sell on my Kozy Kuddler Facebook page. 
They are all white, 100% cotton, machine washable and super soft. 


Here's a pic! 

And there is a GIVEAWAY going on too! One lucky winner will receive:
1 Regular Set and 1 Thicker Set (Value: $10)

If you're not pregnant or nursing, these make great gifts for someone who is.

Thanks for looking and good luck! Open to US and Canada only.
a Rafflecopter giveaway

Friday, August 31, 2012

Nine Pound Pork Loin. Now what?

Ok, so this isn't sewing/craft related...it's still good information to pass along.
I know it saves us a lot of money, so I wanted to share it with you to help pass on the savings!!

Whole Boneless Pork Loin: 9.33 lbs
Cost: $23.00 (Not on sale. No coupons. Hormel brand.)
Meals provided: 7 dinners for 2 adults and a 3 year old (and 2 work lunches for the hubs)
Cost per meal for meat: $3.29/meal or about $1.10 per person. (not counting the work lunches)

(Imagine the savings if it HAD been on sale though...or if I had a coupon or something. Yeah, that would've been nice.)

Ok, so you're going to want to prepare a space to cut the meat, and be sure it can be bleached & scrubbed down well afterwards. I also like labeling the bags while they are nice and flat and then filling in the weights/amounts once they contain the pork.

So here's how we cut it up:
2 Freezer Quart bags of slivers weighing just under a pound each. They were 0.98lb and 0.96lb.

3 Freezer Quart bags of pork chops weighing about 1.5lb for the 6 Chops in each pack. Chops can be cut to whatever thickness you like. The ones we cut are usually between 1/2" and 3/4" thick since that is how we like them.

1 Freezer Gallon bag with a large roast weighing 2.83lb. As a family of 3, this will last us 2 dinners (and 2 meals for hubby to take to work for lunch), and probably some leftovers for the dogs. I just change up the sides to keep it interesting on the second day. 


This is how it looked like during the process, and before my hands got gross. Hubby was cutting and I had just labeled the bags. See how he's trimmed some of the fat off...not all of it, but that can be done later if necessary. And look at those chops! YUM!

And here is how I season & prepare them, usually:

I make stir-fry with the slivers. I don't add seasoning to the bag before freezing. When it's time to cook them, I toss the slivers in the pan with a little olive oil, cook thoroughly, then I add a bag of frozen stir-fry veggies (and/or fresh if I have some). I add some teriyaki sauce or a few drops of soy sauce. Sometimes, I add the Pampered Chef Asian Seasoning Mix just because I still have some around. Frozen veggies usually cost us about $2 for a bag, keeping the whole meal under $8, even if I add rice. I don't use boil-in-a-bag type rice anymore. It's cheaper and takes only 10mins longer to cook the regular rice.

The pork chop bags get a little olive oil added to them and then a packet or various seasonings before freezing. I LOVE the Grill Mates Baja Citrus pack from McCormick. I don't usually follow the instructions (ever...in anything, really!!) so I just add the seasonings to the olive oil and call it a day. I label the Ziploc freezer bags with the cut, date and seasonings. I'll add lemon pepper, minced garlic, whatever spices we have in the pantry that work well with pork, or the staple around here, Tony Chachere's Creole Seasoning. One pack today had Tony Chachere's and olive oil with a little bit of  McCormick's Montreal Steak Seasoning too. The 6 chops I'm making tonight are marinated in a little olive oil and Montreal Steak Seasoning and a pinch of sea salt. I know it's pork, not steak, but it's really good..trust me. I'm grilling them now actually. About 10 mins. on each side does the trick. I always check the temp. with a meat thermometer just to be on the safe side though. Under-cooked pork is NOT something you want to mess with. I like baked pork chops too, but don't do it that often. For cooking pork, check out: THIS GUIDE
Pork chops usually get served with 2-3 veggies as side dishes. Still cheap dinners costing less than $10 for the whole meal, even using fresh veggies!

The large roast is in the freezer with a little olive oil and flavored with Grill Mates Mesquite Marinade. BTW, I'm also a fan of the Grill Mates Mojito Lime and the Tomato, Garlic & Basil packets. No, they're not paying me to say this, it's just what we normally purchase and use.
Again, I didn't mix up the marinade as it calls for, just dumped the packet into the freezer bag and squished it around with the olive oil. When I thaw the pork loin, it will also be soaking up the seasonings, saving me some time and adding amazing flavor! To cook it, I pop it in the oven in a deep baking pan with a few cans or some fresh veggies and bake for about 20mins. per pound of pork or until it reaches the correct temperature*. It's really good to toss in the slow cooker with some veggies and let it go all day, too! Super cheap meal too!
I usually serve this with rice the second day and add some more veggies to replenish what we ate the night before.
 

*PORK COOKING CHART  Yes, I put the same chart on here twice. If there was going to be a test on this subject, this would be on it.


Want some other meal ideas? Check out the recipes HERE!

Sunday, February 5, 2012

1,000 FAN GIVEAWAY!!!


Giveaway time! 

I'm so excited about making 1,000 fans via my facebook page (find it here!) and want to give back to my wonderful fans!! 

I've got a Kozy Kuddlers by KAL goody basket for ONE awesome fan!
It contains: 

1 Long Neck Kozy Kuddler (washable hot/cold pack)
1 Heart-shaped Kozy Kuddler  (washable hot/cold pack) 
Homemade soaps 
and a few "wild" extras!!
  There is also a $25 Gift Code for Restaurant.com and Gerbera Girl has also offered up an awesomely "wild" bow.

 Total value is over $60!!

(Rafflecopter entry form is below...keep scrolling after the photo) 


Tuesday, January 31, 2012

#5 of the $10 Toddler Time Series--I Spy Princesses

Welcome to #5 in the $10 Toddler Time Series! We're half-way through the 10 post series! I appreciate all of you who have taken the time to read and share this series!! 


Today we're making an I Spy bag, a no-sew version for the non-crafty folk. 
(I'll be doing a sewing tutorial soon too!)

You'll need the following:
Envelope-Already had ($2 to buy a 10 pack)
Rice-Already had ($2 to buy)
Small items to put inside-Already had (Find small things around the house)
Sandwich bag-Already had ($1 to buy)
Tape-Already had ($2 to buy)
Scissors-Already had ($1 to buy)

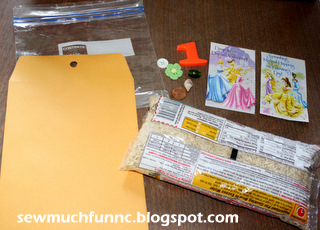
Gather your items. Emily helped me pick out a few small items to add into the I Spy pack. We have a flower, button, bead, penny and stickers from her Valentine's Day cards. I left out the number 1 in the pic because it was a little too bulky. 


Draw and cut out a window in the envelope. I ended up making mine a little larger at the end, but you get the idea. Emily wanted princesses to find, so I used the stickers from her Valentine's Day cars. I stuck them on the cards, then cut them out so they wouldn't have sticky backs and would be a little more sturdy.

 
Place the sandwich bag in the envelope and fill with rice. I only filled to just above where the window is on the envelope. I ended up using about 3/4 of the bag of rice. You can use more or less depending on how you feel. Just remember the more you use, the more you'll have to clean up if you decide to let your toddler loose with one of these and turn your head for 5 minutes to do the dishes. But, I did use tape to reinforce the sides of the envelope AND I also taped the envelope closed at the top. 


Here are Ariel and Tiana just hanging out waiting for a shuffle of the bag so we can find them all over again! 


(See the reinforced edges? I know my child all too well.)
 On the back, I've added a list of things for Emily to look for so she knows just what is inside. 

I've also let her decorate the envelope with more of the stickers. I'd rather them be on the outside of the envelope than all over my table, the TV or anything else in the house.


See ya next Tuesday for #6!


Tuesday, January 24, 2012

#4 of the $10 Toddler Time Series--Great Finger Paint Tip

Back in my old life (the one I had before I became a wife and mom), I worked at a preschool. It was a lot of fun for the most part and I picked up a lot of great ideas to use now that I am the mom of a 2.5 year old.
One good lesson was to go with the flow. See how that played out for this week's toddler craft time.

The conversation went something along the lines of this:
Me: Emily let's do some arts and crafts now so mommy can blog about it and share with the world. We're going to make super cute ladybugs.
Emily: No thank you.
Me: What?! You don't want to make ladybugs so we can count their spots??? (sounding a little disappointed)
Emily: Nah.
Daddy interjects: What about Christmas Trees?
Emily: YEAHHHHH
Me: Ummm, Christmas is over. What about Valentine's Day hearts?
Emily: No, I want to make Christmas Trees. Let's do that!
Me: How about we make a big sun and we'll do some painting?
Emily: Yeahhh and make snowmen?!
Me: Nooo. We are not making snowmen today.
(Had there actually been SNOW on the ground, we would have totally made real snowmen, but it was in the 60's today and sunny.)

Here's what you'll need to do what we did:
Paint--Already had ($1 each color to buy)
Paper Plate (I'm classy like that, ya know?!)--Already had ($1 for 10 or use some leftover birthday ones!)
Paintbrush--Already had ($1 for some cheap-o ones)
Paper--Already had ($5 for 150 sheets)
Liquid Soap--Already had ($1 to buy)

Not necessary, but nice to have for this and other projects:
Hole punch--Already had thanks to my awesome hubby! ($25 to buy)
Glue--Already had ($1 to buy)
Scissors--Already had ($1 to buy)
Smock*--Already had (used one of Matt's old t-shirts. See note at bottom)

So that's what we did. I broke out my new circle punch. It's a 3.5" massive punch that I happen to be loving right now! I punched out a yellow circle and got out some paint. Now you could paint a circle to start with, you can also cut a circle out with scissors...I wanted an excuse to use my new punch. I glued it down on a sheet of paper and demonstrated without paint, how we were going to do the project since I would need to be taking pics and couldn't guide her the whole time. I painted her fingers and thumb on her right hand and let her place her hand around the circle to make the sun rays.
 
Oh! The super awesome tip to share: Add liquid soap to the paint! It REALLY helps make clean-up a lot easier!! Just add a few drops to each color and mix. 

 So here's how it went..Pretty well, I'll say. 


After a few times of me pushing down on her hand, she wouldn't let me help anymore.
I forgot I was raising Miss Independent. 


 She painted a little more with a brush after the sun was finished.
       And it ALWAYS makes Emily happy when Daddy joins in on the fun :) 


Clean up was a breeze! 
Warm water took care of her hands, the brushes and our dining room table.
Now, let's hope that sometime this week she'll want to do those ladybugs!


*Easy Smock--Find an old adult sized t-shirt. I used one of Matt's old shirts. I cut about 4" out of the back of the shirt (lay shirt flat on table and eyeball a few inches to cut out. You'll want to cut from the collar all the way to the bottom seam--just cut it off of the shirt) but you can cut more or less, depending on the kid and shirt sizes, to make the opening. I use a safety pin to keep the collar tight.  I just throw the shirt up in the spare shower when it's not in use. 

Tuesday, January 17, 2012

#3 of the $10 Toddler Time Series--Silky Dough


I've made homemade playdough a few times and thought I'd try something different this time. This is a neat project to do and can be quite messy, depending on the kid of course! 

To make this silky type dough, you will need:
1 cup Baby Oil--Already had ($1 to buy)
8 cups Flour--Already had  ($2 to buy)
Large bowl or storage bag--Already had ($1 to buy)

I wasn't sure how this would work out so I decided to cut the recipe in half this first time. 

And yes, I tried to add food coloring, not such a good idea...Paint would probably work better, but I didn't feel like making THAT much of a mess. 
We stuck it out being its natural color.


I actually mixed these in a plastic storage bag, but you could use a bowl instead. 
I didn't have a big enough bowl that was clean. 
True story. 

Emily said she was making a "sandcastle" although it looks as if she is about to destroy it in the next photo.


And then it was destroyed! The bits were scattered all around and then they looked more and more like a sandbox had been dumped out on the dining room table. Emily loved the feel of the "dough" and I thought it felt a bit like deodorant all crumbled up. It smelled nice and made my hands feel pretty and moisturized. 
I suppose I could have added more baby oil to make the dough more "sticky" but we really did have fun with it just the way it was. Obviously, if you wanted it more dry, add more flour. 


We made a turtle!!


 And we practiced our letters! It's "A" week again here!


In the end, it was a fun 30-minute distraction from the real world. We enjoyed it and she's already asked if we could play in it again. I did wipe the leftovers back into the storage baggie and put it HIGH on a shelf in the closet. Clean-up was a cinch! It wiped right up off the table and the small bits that managed to get on our floor were swept up easily also.

EXTRA BONUS!
It used up the baby oil that has been in the closet since one of my baby showers for Emily! I love crafts that use up stuff that has been just sitting around collecting dust!