Monday, February 11, 2013

February Giveaway!!!!

Happy February!

I've been away from my blog for a little while, so I thought I'd do a giveaway to help breathe some life back into things. Well, that and I can't seem to get the Rafflecopter widget installed on the Kozy Kuddlers Facebook page. (I've been noticing a lot of issues with RC lately...IDK if it's just me, but not cool. If I can get it added, it will also be posted on the FB page. For now, it's only here on the blog.)

With getting things going again, I discovered that the price of cherry pits more than doubled! Whoa! There was a freeze that hurt the 2012 cherry crop, so prices went up, up, up! I'm going to try and keep prices reasonable though and absorb what I can. I was able to secure some cherry pits though, so I'm doing a little happy dance over here. 

Here's a little more info about Kozy Kuddlers, since I'm sure you were wondering:
What are Kozy Kuddlers?
Kozy Kuddlers are Hot/Cold Cherry Stone Packs. They can be heated in the microwave for warm, moist heat therapy, or chilled in the freezer for some cooling relief! 
Cherry WHAT?!
Cherry stones are the stone seeds from a cherry. The cherry stones I use are all natural, specially cleaned and dried, with no added chemicals. You MAY add a few drops of essential oil to your Kozy Kuddler for aromatherapy purposes if you so choose. I recommend testing a small spot on the Kozy Kuddler because some oil can stain fabrics.
What can they be used for?
Migraines, Sprains and Strains, Pregnancy aches and pains, Breastfeeding discomforts or to help with let down, Arthritis, Sore muscles, Feet & Hand Warmers, Bed Warmers, Back aches, Bumps and Bruises on little ones, Menstrual cramps, Headaches, Pain relief after shots...Any place direct application of heat or cold would be warranted…So many possibilities!
Several sizes and shapes available! I also take special orders! 


Good luck!
Here is a photo of the KK up for grabs!! 


a Rafflecopter giveaway

Friday, September 14, 2012

Reusable Nursing Pad Giveaway Ends 9/30/12


Hey everybody! Finally touching base again on a sewing topic. Yay! 
I've been crafting up a storm lately, well when I haven't been fighting with my sewing machine anyways. 
I've made up quite a few reusable nursing pads and wanted to share! These are the same nursing pads I sell on my Kozy Kuddler Facebook page. 
They are all white, 100% cotton, machine washable and super soft. 


Here's a pic! 

And there is a GIVEAWAY going on too! One lucky winner will receive:
1 Regular Set and 1 Thicker Set (Value: $10)

If you're not pregnant or nursing, these make great gifts for someone who is.

Thanks for looking and good luck! Open to US and Canada only.
a Rafflecopter giveaway

Friday, August 31, 2012

Nine Pound Pork Loin. Now what?

Ok, so this isn't sewing/craft related...it's still good information to pass along.
I know it saves us a lot of money, so I wanted to share it with you to help pass on the savings!!

Whole Boneless Pork Loin: 9.33 lbs
Cost: $23.00 (Not on sale. No coupons. Hormel brand.)
Meals provided: 7 dinners for 2 adults and a 3 year old (and 2 work lunches for the hubs)
Cost per meal for meat: $3.29/meal or about $1.10 per person. (not counting the work lunches)

(Imagine the savings if it HAD been on sale though...or if I had a coupon or something. Yeah, that would've been nice.)

Ok, so you're going to want to prepare a space to cut the meat, and be sure it can be bleached & scrubbed down well afterwards. I also like labeling the bags while they are nice and flat and then filling in the weights/amounts once they contain the pork.

So here's how we cut it up:
2 Freezer Quart bags of slivers weighing just under a pound each. They were 0.98lb and 0.96lb.

3 Freezer Quart bags of pork chops weighing about 1.5lb for the 6 Chops in each pack. Chops can be cut to whatever thickness you like. The ones we cut are usually between 1/2" and 3/4" thick since that is how we like them.

1 Freezer Gallon bag with a large roast weighing 2.83lb. As a family of 3, this will last us 2 dinners (and 2 meals for hubby to take to work for lunch), and probably some leftovers for the dogs. I just change up the sides to keep it interesting on the second day. 


This is how it looked like during the process, and before my hands got gross. Hubby was cutting and I had just labeled the bags. See how he's trimmed some of the fat off...not all of it, but that can be done later if necessary. And look at those chops! YUM!

And here is how I season & prepare them, usually:

I make stir-fry with the slivers. I don't add seasoning to the bag before freezing. When it's time to cook them, I toss the slivers in the pan with a little olive oil, cook thoroughly, then I add a bag of frozen stir-fry veggies (and/or fresh if I have some). I add some teriyaki sauce or a few drops of soy sauce. Sometimes, I add the Pampered Chef Asian Seasoning Mix just because I still have some around. Frozen veggies usually cost us about $2 for a bag, keeping the whole meal under $8, even if I add rice. I don't use boil-in-a-bag type rice anymore. It's cheaper and takes only 10mins longer to cook the regular rice.

The pork chop bags get a little olive oil added to them and then a packet or various seasonings before freezing. I LOVE the Grill Mates Baja Citrus pack from McCormick. I don't usually follow the instructions (ever...in anything, really!!) so I just add the seasonings to the olive oil and call it a day. I label the Ziploc freezer bags with the cut, date and seasonings. I'll add lemon pepper, minced garlic, whatever spices we have in the pantry that work well with pork, or the staple around here, Tony Chachere's Creole Seasoning. One pack today had Tony Chachere's and olive oil with a little bit of  McCormick's Montreal Steak Seasoning too. The 6 chops I'm making tonight are marinated in a little olive oil and Montreal Steak Seasoning and a pinch of sea salt. I know it's pork, not steak, but it's really good..trust me. I'm grilling them now actually. About 10 mins. on each side does the trick. I always check the temp. with a meat thermometer just to be on the safe side though. Under-cooked pork is NOT something you want to mess with. I like baked pork chops too, but don't do it that often. For cooking pork, check out: THIS GUIDE
Pork chops usually get served with 2-3 veggies as side dishes. Still cheap dinners costing less than $10 for the whole meal, even using fresh veggies!

The large roast is in the freezer with a little olive oil and flavored with Grill Mates Mesquite Marinade. BTW, I'm also a fan of the Grill Mates Mojito Lime and the Tomato, Garlic & Basil packets. No, they're not paying me to say this, it's just what we normally purchase and use.
Again, I didn't mix up the marinade as it calls for, just dumped the packet into the freezer bag and squished it around with the olive oil. When I thaw the pork loin, it will also be soaking up the seasonings, saving me some time and adding amazing flavor! To cook it, I pop it in the oven in a deep baking pan with a few cans or some fresh veggies and bake for about 20mins. per pound of pork or until it reaches the correct temperature*. It's really good to toss in the slow cooker with some veggies and let it go all day, too! Super cheap meal too!
I usually serve this with rice the second day and add some more veggies to replenish what we ate the night before.
 

*PORK COOKING CHART  Yes, I put the same chart on here twice. If there was going to be a test on this subject, this would be on it.


Want some other meal ideas? Check out the recipes HERE!

Sunday, February 5, 2012

1,000 FAN GIVEAWAY!!!


Giveaway time! 

I'm so excited about making 1,000 fans via my facebook page (find it here!) and want to give back to my wonderful fans!! 

I've got a Kozy Kuddlers by KAL goody basket for ONE awesome fan!
It contains: 

1 Long Neck Kozy Kuddler (washable hot/cold pack)
1 Heart-shaped Kozy Kuddler  (washable hot/cold pack) 
Homemade soaps 
and a few "wild" extras!!
  There is also a $25 Gift Code for Restaurant.com and Gerbera Girl has also offered up an awesomely "wild" bow.

 Total value is over $60!!

(Rafflecopter entry form is below...keep scrolling after the photo) 


Tuesday, January 31, 2012

#5 of the $10 Toddler Time Series--I Spy Princesses

Welcome to #5 in the $10 Toddler Time Series! We're half-way through the 10 post series! I appreciate all of you who have taken the time to read and share this series!! 


Today we're making an I Spy bag, a no-sew version for the non-crafty folk. 
(I'll be doing a sewing tutorial soon too!)

You'll need the following:
Envelope-Already had ($2 to buy a 10 pack)
Rice-Already had ($2 to buy)
Small items to put inside-Already had (Find small things around the house)
Sandwich bag-Already had ($1 to buy)
Tape-Already had ($2 to buy)
Scissors-Already had ($1 to buy)

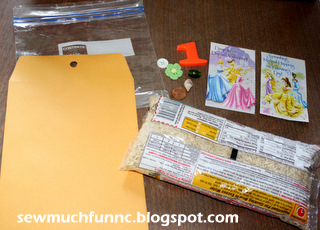
Gather your items. Emily helped me pick out a few small items to add into the I Spy pack. We have a flower, button, bead, penny and stickers from her Valentine's Day cards. I left out the number 1 in the pic because it was a little too bulky. 


Draw and cut out a window in the envelope. I ended up making mine a little larger at the end, but you get the idea. Emily wanted princesses to find, so I used the stickers from her Valentine's Day cars. I stuck them on the cards, then cut them out so they wouldn't have sticky backs and would be a little more sturdy.

 
Place the sandwich bag in the envelope and fill with rice. I only filled to just above where the window is on the envelope. I ended up using about 3/4 of the bag of rice. You can use more or less depending on how you feel. Just remember the more you use, the more you'll have to clean up if you decide to let your toddler loose with one of these and turn your head for 5 minutes to do the dishes. But, I did use tape to reinforce the sides of the envelope AND I also taped the envelope closed at the top. 


Here are Ariel and Tiana just hanging out waiting for a shuffle of the bag so we can find them all over again! 


(See the reinforced edges? I know my child all too well.)
 On the back, I've added a list of things for Emily to look for so she knows just what is inside. 

I've also let her decorate the envelope with more of the stickers. I'd rather them be on the outside of the envelope than all over my table, the TV or anything else in the house.


See ya next Tuesday for #6!


Tuesday, January 24, 2012

#4 of the $10 Toddler Time Series--Great Finger Paint Tip

Back in my old life (the one I had before I became a wife and mom), I worked at a preschool. It was a lot of fun for the most part and I picked up a lot of great ideas to use now that I am the mom of a 2.5 year old.
One good lesson was to go with the flow. See how that played out for this week's toddler craft time.

The conversation went something along the lines of this:
Me: Emily let's do some arts and crafts now so mommy can blog about it and share with the world. We're going to make super cute ladybugs.
Emily: No thank you.
Me: What?! You don't want to make ladybugs so we can count their spots??? (sounding a little disappointed)
Emily: Nah.
Daddy interjects: What about Christmas Trees?
Emily: YEAHHHHH
Me: Ummm, Christmas is over. What about Valentine's Day hearts?
Emily: No, I want to make Christmas Trees. Let's do that!
Me: How about we make a big sun and we'll do some painting?
Emily: Yeahhh and make snowmen?!
Me: Nooo. We are not making snowmen today.
(Had there actually been SNOW on the ground, we would have totally made real snowmen, but it was in the 60's today and sunny.)

Here's what you'll need to do what we did:
Paint--Already had ($1 each color to buy)
Paper Plate (I'm classy like that, ya know?!)--Already had ($1 for 10 or use some leftover birthday ones!)
Paintbrush--Already had ($1 for some cheap-o ones)
Paper--Already had ($5 for 150 sheets)
Liquid Soap--Already had ($1 to buy)

Not necessary, but nice to have for this and other projects:
Hole punch--Already had thanks to my awesome hubby! ($25 to buy)
Glue--Already had ($1 to buy)
Scissors--Already had ($1 to buy)
Smock*--Already had (used one of Matt's old t-shirts. See note at bottom)

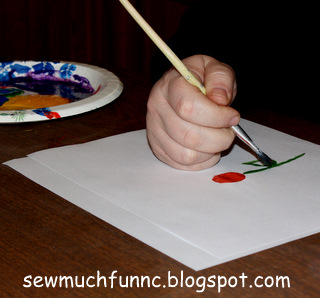
So that's what we did. I broke out my new circle punch. It's a 3.5" massive punch that I happen to be loving right now! I punched out a yellow circle and got out some paint. Now you could paint a circle to start with, you can also cut a circle out with scissors...I wanted an excuse to use my new punch. I glued it down on a sheet of paper and demonstrated without paint, how we were going to do the project since I would need to be taking pics and couldn't guide her the whole time. I painted her fingers and thumb on her right hand and let her place her hand around the circle to make the sun rays.
 
Oh! The super awesome tip to share: Add liquid soap to the paint! It REALLY helps make clean-up a lot easier!! Just add a few drops to each color and mix. 

 So here's how it went..Pretty well, I'll say. 


After a few times of me pushing down on her hand, she wouldn't let me help anymore.
I forgot I was raising Miss Independent. 


 She painted a little more with a brush after the sun was finished.
       And it ALWAYS makes Emily happy when Daddy joins in on the fun :) 


Clean up was a breeze! 
Warm water took care of her hands, the brushes and our dining room table.
Now, let's hope that sometime this week she'll want to do those ladybugs!


*Easy Smock--Find an old adult sized t-shirt. I used one of Matt's old shirts. I cut about 4" out of the back of the shirt (lay shirt flat on table and eyeball a few inches to cut out. You'll want to cut from the collar all the way to the bottom seam--just cut it off of the shirt) but you can cut more or less, depending on the kid and shirt sizes, to make the opening. I use a safety pin to keep the collar tight.  I just throw the shirt up in the spare shower when it's not in use. 

Tuesday, January 17, 2012

#3 of the $10 Toddler Time Series--Silky Dough


I've made homemade playdough a few times and thought I'd try something different this time. This is a neat project to do and can be quite messy, depending on the kid of course! 

To make this silky type dough, you will need:
1 cup Baby Oil--Already had ($1 to buy)
8 cups Flour--Already had  ($2 to buy)
Large bowl or storage bag--Already had ($1 to buy)

I wasn't sure how this would work out so I decided to cut the recipe in half this first time. 

And yes, I tried to add food coloring, not such a good idea...Paint would probably work better, but I didn't feel like making THAT much of a mess. 
We stuck it out being its natural color.


I actually mixed these in a plastic storage bag, but you could use a bowl instead. 
I didn't have a big enough bowl that was clean. 
True story. 

Emily said she was making a "sandcastle" although it looks as if she is about to destroy it in the next photo.


And then it was destroyed! The bits were scattered all around and then they looked more and more like a sandbox had been dumped out on the dining room table. Emily loved the feel of the "dough" and I thought it felt a bit like deodorant all crumbled up. It smelled nice and made my hands feel pretty and moisturized. 
I suppose I could have added more baby oil to make the dough more "sticky" but we really did have fun with it just the way it was. Obviously, if you wanted it more dry, add more flour. 


We made a turtle!!


 And we practiced our letters! It's "A" week again here!


In the end, it was a fun 30-minute distraction from the real world. We enjoyed it and she's already asked if we could play in it again. I did wipe the leftovers back into the storage baggie and put it HIGH on a shelf in the closet. Clean-up was a cinch! It wiped right up off the table and the small bits that managed to get on our floor were swept up easily also.

EXTRA BONUS!
It used up the baby oil that has been in the closet since one of my baby showers for Emily! I love crafts that use up stuff that has been just sitting around collecting dust!


Thursday, January 12, 2012

Valentine's Coaster Giveaway!

I took some spare time and whipped up some fabric Valentine's Day Coasters. It's a set of 4. I am giving them away on my Facebook Page. Entries will be accepted now until Jan. 25th. Here's the direct link to the giveaway:
SUPER COOL AWESOME V-DAY COASTER SET


And here's a shot of the coasters!!

Tuesday, January 10, 2012

#2 of the $10 Toddler Time Series--Counting Birdies

Sunday afternoon was rainy and nasty out, so I took a few hours to come up with a quick little schedule for Emily and I. Each month until the end of the year has a theme and each week, we'll be discussing a little bit about the monthly theme, along with a letter of the week. All this because I have entirely too much time on my hands...according to some people :)  
This month's theme is numbers! And this week, we're learning 1,2 and 3. Now, Emily can count already (and she counts to 15 then switches over to Spanish...lol), but I want her to be able to recognize the numbers and to start practicing writing them as well. 

Anywho, this project is super simple. You could use construction paper for everything but I had a bad experience with some and threw the whole pack out. Yeah, apparently when it gets wet, the colors bleed...and bleed they did, onto the wood floors and stained them in one corner. Nice, huh? That's why I tossed the rest of the sheets I had. Not swearing it off forever, I just haven't remembered to purchase more. 

Here's what you'll need:
Construction Paper or card stock and paint-Already had ($5 to buy 150 sheets, paint is $1)

School Glue or tape, depending on your patience-Already had ($1 to buy)
3 (1 for each number) Craft sticks-Already had ($1 to buy 150)
Pen/Marker-Already had ($1 to buy)
Scissors or sharp craft knife-Already had ($1 to buy)
Paint brush-Already had (0.50 to buy)
Paper Plate-Already had ($1 to buy 20)

Put it together:
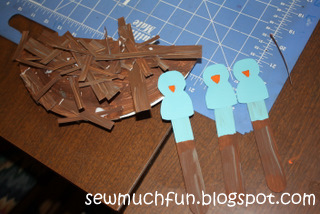
I have paint, so that's what I used. I am not claiming to be a painter...I have ZERO painting and drawing skills, really. I painted half of each craft stick blue and the other half brown. Then, I painted some blue blobs on a sheet of card stock and painted brown underneath. See pic.


I folded a paper plate in half. I glued and taped it shut. 


I painted one side of the plate brown. Emily added a touch of orange...you'll see it later on. I let those dry for an hour and cut out my shapes from the blue blobs and brown painted paper. Again, my drawing skills are lacking so I did basic birdie looking shapes. The "sticks" for the nest are just strips of the brown painted paper. I glued on the bird figure to the blue end of the stick. 


Here is Emily adding the "sticks" to the nest. We did a mixture of me putting dots of glue on the plate and letting her dip the back of the "stick" into the glue. I bet you all can guess which one she preferred :)


I added tufts of hair to the birds. Bird 1, received one spike, Bird 2 has two...you get the idea, right? I painted on little orange beaks and using an ink pen (where on Earth are my Sharpies????) added eye balls and wing detail. On the back side of the craft stick, I wrote out the number words and added the number to the bottom. I used a sharp craft knife to cut 3 slits in the top of the nest (along the fold) and inserted the birds on sticks. Emily likes putting them in the nest and taking them out again.

 
Next week's project will again be number related and the book for next week is The Ants Go Marching...I'm trying to figure out a cute craft that includes ants...not real ones, of course :) 

~Kristin


Tuesday, January 3, 2012

#1 of the $10 Toddler Time Series-Paint Bubbles!!

*Since this is the first of the series, I want to warn you that I rarely follow directions, that I often "make-do" with what I've got and will do whatever I need to do in order to reach the end product. You can take from the posts what you'd like to get out of it or change it up to fit your needs. It's called being able to adapt and overcome.


I saw this craft over at Disney Family Fun and thought it would be perfect for us to do. There is even a nifty video on their site if you get confused :)


What you'll need:
Bubble Solution-Already had ($1 to buy)
Tempera Paint (I used Food Coloring since we only had Acrylic paint)-Already had (Paint $1 or Food Coloring $2 to buy)
Pie Tins-Already had ($1 to buy)
Drinking Straws-Already had ($1 to buy)
Paper (I used card stock so we can use it for a future project)-Already had ($5 to buy 150 sheets...enough for SEVERAL projects!!)


**To make this toddler friendly, I covered our work station with a plastic sheet we had around the house.


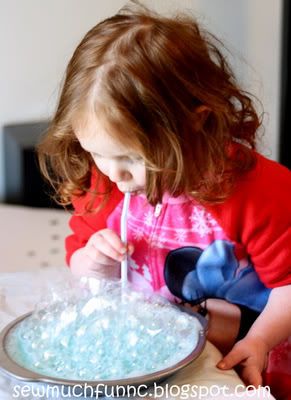
Gather supplies. Mix 1/2 cup paint (or add food coloring, I used about 15-20 drops) with 1 cup bubble solution and pour into pie tin. (Finally get to use my pie pans for something! Hooray!) Stick one end of the straw into the paint/soap mixture and blow! Bubbles will start forming and the pile of bubbles will get taller and taller! FYI: I did try using the acrylic paint too, but the color didn't show up. That's why I broke out the food coloring.


***Watch your kid closely to make sure they don't suck in through the straw! If you have any doubts about your kid, wait until they are a little older please.*** Emily knows better...I have to get on to her about blowing chocolate milk bubbles almost daily! I still watched her closely though.


Once you have a pile of bubbles, hold the paper in both hands and lightly pat the bubbles with the paper. Rotate the paper and repeat with more bubbles if you want more of the effect. I did it three time each because the first few times were pretty light. You can just do the one color or you could do a rainbow of colors on one sheet. It's up to you!!


I used this as a teaching project! Emily knows her colors, so I was showing her how blue+yellow=green! She thought that was neat! We also did red+blue=purple. I want to do this next time using multiple colors in one pie pan to see the effect it achieves!!
So simple to do and no two works of art are ever the same!


Here are some pics from our experience!! Yes, she's wearing pj's...just be happy she even has clothes on!

Photobucket

Photobucket

Photobucket

Photobucket

Monday, January 2, 2012

New Year's Resolutions...

Almost everybody has them...and I'm included! Here's what I'll be working on this year! Best of luck to all of you with your goals!!

Personal goals:
1. De-clutter the house!
--Take out at least 2 bags of clutter a week, either for donation if it's still usable or to the trash if it's not usable.
2. De-clutter my body!
--I want to shed 30lbs before May. I CAN do this! Six pounds a month is very reasonable!
3. To not let people take advantage of me and to be ok with saying "no" sometimes.

Business Goals:
1. To not buy any more fabric unless it is for a specific project that I WILL complete or if a customer requests it.
--Luckily I have some orders on tap that will help with this. I am hoping to have all the fabric on hand reduced to 1 closet worth by the end of the year. I may have to get pretty creative with this one, but we'll see! I may also do some de-stashing since it does count as part of the clutter too!
2. To reach 1,000 fans!! I'm at 730 right now.
--Giveaways should help!!
3. To clean up my work area once a week so I am more efficient.

Blog Goals:
1. $10 Tuesday Toddler Time...a series of toddler friendly crafts done on the cheap!
--Using stuff we can find around the house. If you have an idea, please comment or send me and email!
2. 65 Blog Posts this year!!!!! 64 more to go!
--Going to schedule a little time each week for this.
3. Post more pictures!!
--I got this! :)

Friday, December 30, 2011

Happy (almost) New Year!

Happy (almost) New Year! 

During the chaos of the holidays, I started quite a few new projects!
Hooray for keeping busy!

And although I've been trying my hardest NOT to start anything on Pinterest, I find myself on there at least once a week...still not a member. I probably won't sign up until there is some sort of privacy block on the boards. I have no desire to share my "pins" with everyone else in the world. That takes away from the individuality...and besides, if I want to try out a new idea and have it "pinned", I'd hate to see friends do it before I get around to it. Does that make me selfish???
Perhaps! It's on the same lines as me not giving out my exact recipes all the time. If it is a special recipe, I'll leave a detail or two out. Nothing personal, but if I worked to achieve a certain flavor or technique, I'm surely not just going to give it up to anyone. Guess that makes me slightly evil, but I'm ok with that.

Next post will show pics of some of the fun things I've been making! Stay tuned!

Tuesday, October 25, 2011

Saving money for the holidays!

Sooo I did pretty good last year with buying Christmas presents on sale and got some really good deals. I was pretty proud of myself! I used swagbucks (click the link to sign up if you're not already a member) for 8 months out of the year and used the FREE amazon.com gift cards to purchase most of the gifts. If you keep a watchful eye, you can get some really good deals on there!! Also, sign up for Amazon Mom (free) and you can get free 2-day shipping on a lot of products. Swagbucks is now offering printable coupons as well! You can earn 10SB for each coupon that gets used--just don't forget them at home like I usually do!!

Another program I've joined an would like to share with you is ebates.com!
It's simple to use! Anytime you are going to make a purchase online (and they've got TONS of stores to choose from) just go through your ebates page. A tracking ticket is created and once the order is confirmed, you will get a percentage back! I've got mine set up to go straight into my paypal account....very handy! They also have a $5 sign up bonus :)
Check them out and sign up here: My ebates link

Ebates is nice because it literally takes just a few seconds to log in (I use FB login to make it even quicker) then to pick the store you are going to purchase from. Some of my favorite stores on there are crocs.com (5% cash back), fabric.com (4% cash back), walmart.com (2% cash back) and maurices.com (4% cash back). I do the majority of my shopping online because we live in the boonies (it's about 2 hours to the nice mall) and I can't stand the holiday rush of people...Seriously?! Where do they all come from????

What are some ways you plan on saving money this year???

Tuesday, October 11, 2011

Resurrecting the Blog!

Ok, so I'll admit, I've not been the best blogger recently. Fear not, all that is about to change!!

I've been crafting a lot lately and cooking/baking as usual. Now that Punky Brewster (Emily) is a bit older, she's been wanting to "help" a lot more.

Sooo I've been thinking, why not just blog about the stuff we are already doing. It'll encourage me to write more often, force me to remember some of the arts & craft activities from my preschool teaching days, find awesome ideas to share and maybe come up with a few of my own!

I'll share tonight a quick homemade potato chip recipe, that I've come up with.

You'll need:
5-6 large Russet Potatoes
Pampered Chef Ultimate Mandolin (came in my consultant kit and is VERY handy!)
Olive Oil
Dehydrated or fresh minced onions
Salt

Start by washing off the potatoes, with hot soapy water. Cut them in half, place on the Mandolin food holder and slice away. I like to use the crinkle blade for these. Pour olive oil into the pan you plan on using and heat on Med. heat. I prefer using a non-stick 10'' skillet. You'll want to have enough in there so that when you place the potatoes in, they're covered so amounts will vary depending on your pan size. As the oil is heating up, I put in the onions. Around here we rarely have fresh onions...they just go bad before I get around to using them. Dehydrated onions can be found on the spice aisle of your grocery store and while I first thought they reminded me of someone's clipped toenails, I've come to love using them. I usually throw in between 50-75 flakes...I've never actually counted but obviously if you want more onion flavor, you'll add more. Ok, time to put in the potatoes. I place them in one at a time, careful not to get any oil splashed back on me. Let them simmer for about 3-4 minutes and then I flip them using tongs. You'll see the potatoes start to turn a golden brown color and that's a good thing. Take them out when both sides are golden brown. I always put them straight onto a plate covered in paper towels to absorb any extra oil. Then just lightly salt them and enjoy! I find that I can't fry them up fast enough around here! They don't last long since they're so yummy but if you wanted to make some to enjoy at a later time, I would make sure to get them nice and dark so they don't turn mushy over time. You can also experiment with different spices. I've used garlic in with the onions before and it had a really good flavor.

Here' a pic of tonight's chips:
Photobucket

If you make these, let me know what you think!

Wednesday, July 20, 2011

You can't clean clutter!!!

You can't. All that ends up happening is things get shuffled around. The solution? De-Clutter!! Ta-DAH! I know it's not an original idea or anything, but it is something that I need to start working on. Why?? Well because I honestly believe Emily has more toys than she could ever play with...because I have more craft stuff than I could ever use (admitting that was HARD!) and because we deserve to live in a happy, clutter-free home.  How does clutter build-up?? Well it didn't take much here. We moved into a house that was pre-occupied. A lot of things we've found wasn't even from that person, it was the owners before plus the things from my house and then DH's stuff too. Add on top of all that everything a BABY requires (and acquires!) and Yep! Clutter. It's here...it's EVERYWHERE!
So here's the plan: GET RID OF IT! ha! Easier said than done, but that's the plan. And here's the reminder I need to get rid of everything.

I really made this sign and it is posted on the fridge. I also have been a fan of the Flylady system, but have fallen off the wagon. Time to get back up though, brush myself off and work harder this time.

How often do you de-clutter?? How do you keep the clutter away?? I'd love to know!

Saturday, May 21, 2011

New Blog I found today!

Stumbled upon a great new blog today and I want to share it with you all. It's http://familyfocusblog.com and they're having a great Stihl giveaway just in time for Father's Day!
Here is the link to the actual giveaway post: http://freebloggiveaways.com/2011/05/04/stihl-wetdry-vacuum-giveaway/

If you enter, make sure you tell me :) I'd love for someone I know to get it! YAY! But if you don't enter, that's cool too--more chances for me...LOL!

Monday, April 25, 2011

Help Choose May Featured Scent!

It's that time again! Time to choose the Featured Scent for May 2011. **FOUR WINNERS** will be chosen at random to receive bath salt samples.

**Remember that the featured scent is available all month for 10% off!!**

Previously Featured Scents:
February-Pink Chocolate
March-Cucumber Melon
April-Lovely Lavender


Remember to vote, then add a comment to this blog to be entered into the drawing.
Winners will be chosen from the blog comments!!

Thursday, March 31, 2011

No excuses!! (ok, maybe one big one) And a reason to celebrate!

So I've been working on Emily's felt playhouse...I have, I promise! It's coming a little slower than I would've liked though. I've missed 2 deadlines I set for myself and I'm not happy about it. My only excuse? I broke my pelvis. Back in January, I slipped and fell right on my butt! Those who know me personally would probably agree that I thought I had enough "junk in the trunk" to cushion any fall. But that wasn't the case here. I landed just right and have been in pain ever since. I waited some 5 weeks before going to the doctor because I'm stubborn. Also because I knew there was NOTHING at all they could do for me. It's not like they can cast my hip and I'm still breastfeeding  (22months+) so I refused pain meds. I was told to take calcium, something I should've been taking all along, I KNOW!! Basically, I was told that whenever I did something (sit, turn, move) that caused me pain, to not do it. Also, to rest a lot....with a toddler running around like a maniac trying to destroy the house?? Ughhh! I was given a glimmer of hope when they said it normally takes about 8 weeks for a pelvis fracture to heal...but then 8 weeks came and went and I was still hurting a bit. Ten weeks have passed and I still hurt. It's not enough that I complain constantly (hubby may disagree) but it's enough to limit some movements and trying to stay comfortable is still a job in itself.

Soooo that's why I've been slacking on the playhouse. I've not been able to sit and sew more than 10-15mins at a time. I think this weekend I will start making some of the animals for one of the sides and maybe some fruits and veggies. Time to get back in gear!! I've only got until May 15th to finish it!!

In other news, I've still been making my Kozy Kuddlers!! We celebrated 4 years of Kozy Kuddlers this week!! Hooray!! For those of you who don't know what Kozy Kuddlers are, they are machine washable hot/cold therapy packs. Since starting up 4 years ago, I've used over 100,000 cherry seeds! Why cherry seeds? The cherry seeds I use are all natural, specially cleaned and dried, with no added chemicals. They hold heat longer than rice, beans or corn and can be washed unlike many other fillers! .
In addition to KK's, in January I expanded my line to include "Pamper Yourself--Bath Salts/Soaks and Sugar Scrubs." I've been making bath salts for about 5 years now. Mostly for personal use and for gifts. Since my little Punky Brewster (Emily) enjoys using them too, I started paying more attention with how I make them. She has SUPER sensitive skin so her's are all natural and usually contain colloidal oatmeal.
I have also expanded my line to include nursing covers, washable nursing pads, bibs, sippy cup leashes and car seat blankets. And while I have a good bit of it posted on my facebook page, some I have only on my personal page due to crappy people with no imaginations/creativity trying to copy my own designs instead of coming up with their own. Gotta love that!

I guess I need to go round up Punky Brewster...I promised her we'd go outside and play this afternoon :)

Later,
Kristin

Wednesday, March 30, 2011

April Winners!

I combined the polls between the blog and my Facebook Fan Page since 2 days before the contest was over my blog poll decided to take a poo. 


Winners are as follows:


April Featured Scent: Lovely Lavender


5 Winners of Free Bath Salts are:

1. lorisumner
2. WonderMels
3. Carol
4. kaabel
5. PipersMom2009 


You will all receive a sample of March's Featured Scent--Cucumber Melon. I will contact you all later this morning (or afternoon) depending on when I wake up. If you're up and feeling froggy, you are more than welcome to email them to me before then. kozykuddlers [at] yahoo dot com.

We'll do this again in a couple weeks!
Congratulations!

Monday, March 21, 2011

**POLL** April's Featured Scent

Thanks to the new Facebook Giveaway Rules, I've decided to take things over here to make it a lot easier on the both of us. Just select your choice and then comment below that you did it. Five people will win FREE BATH SALT SAMPLES!! I'll use random.org to pick the winner from the comments. The 5 winners will be chosen on March 30th!

**Remember that the featured scent is available all month for 10% off!!**
Previously Featured Scents:
February-Pink Chocolate
March-Cucumber Melon
April-??????

Lovely Lavender
Love Spell
Monkey Farts